When I started promoting LatticeSpot, I wanted a straightforward answer: where could I introduce a new website without buying an advertising campaign? I found plenty of lists. Choosing a useful next step still meant opening each platform, reading its requirements, and working out what happened after submission.
This guide brings together seven free website promotion options for startups and side projects. I have separated my own submission experience from platforms whose official rules I checked. You can use the comparison to choose a place, prepare your materials, and follow your submission through to a public page.
I built LatticeSpot, which is included below. My aim here is to help you find a format that fits your project: a directory listing, a scheduled launch, a hands-on discussion, or a visual place on a shared canvas.
Research checked October 3, 2026. Plans and review queues can change. Submission records describe status at that date, not traffic or sales results.
Find the Right Place for Your Project
Start with the action you want a visitor to take. If you want someone to try software, show the working product. If you want someone to understand a visual project, lead with an image and a clear introduction. If you want a reusable public listing, check what the platform keeps available after launch day.
I would choose one manageable option first. A complete listing on a relevant platform gives you something concrete to inspect and share. Opening twenty submission forms at once makes it easier to lose track of unfinished accounts, missing screenshots, and review messages.
| Platform | Starting point | Free route | Evidence |
|---|---|---|---|
| Launching Next | Startup introduction | Editorial submission | Official form |
| StartupBase | Queued product launch | Standard queue or badge route | Official rules |
| Uneed | Participatory launch day | Queue; score-based retention | Official rules |
| Fazier | Product discovery listing | Basic plan with backlink | Official plan |
| TryLaunch | Scheduled launch | Free plan used for LatticeSpot | My scheduled submission |
| Show HN | A working project people can try | Community submission | Official guidelines |
| LatticeSpot | Visual project introduction | One empty pixel application | My own platform |
Give Your Project a Place to Be Discovered
1. Launching Next: Introduce Your Startup
Launching Next has a direct form for a project name, website, headline, description, and tags. Its categories include side projects and bootstrapped startups. Free submissions are reviewed, with an email sent if the project is published.
I would use this route when the product already has a public website and a clear one-sentence explanation. Prepare a short headline that names the task or audience. Someone reading the listing should understand the project before they need to click through.
Official form checked. The optional paid upgrade speeds up consideration; the free submission is separate. I have not recorded a LatticeSpot publication here.
2. StartupBase: Put a Product Launch in Your Calendar
StartupBase offers a standard free queue without a badge and a faster badge-verified free route. Its published estimates are more than ten weeks for the standard queue and around four to five weeks for the badge route. Submissions are reviewed.
If your site is ready but your launch is flexible, you can prepare the listing while continuing other promotion. Keep a note of which route you chose so you know whether a homepage badge is part of the arrangement.
Official rules checked. The stated dofollow commitment applies to paid launches; free submission is not a guaranteed dofollow placement.
3. Uneed: Prepare for a Launch Event
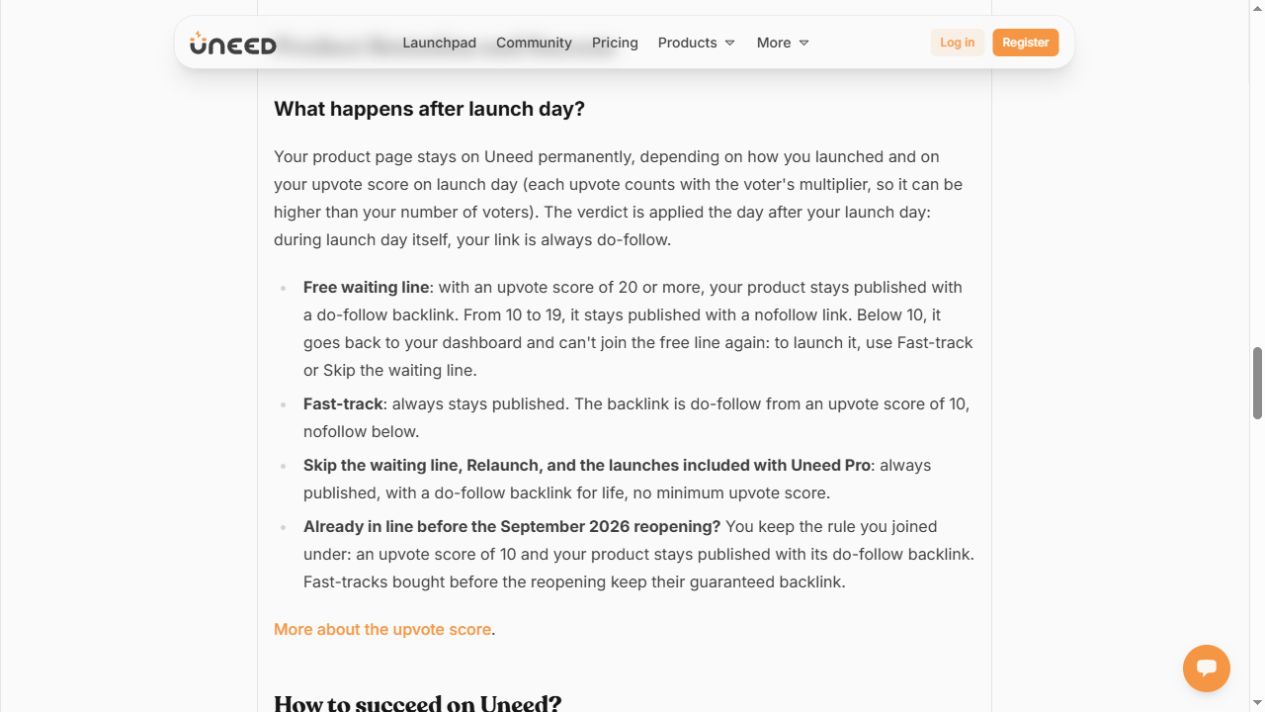
Uneed combines product discovery with voting. Its current free queue assigns a launch date between thirty days and five months out, subject to availability. A free launch needs an upvote score of ten to stay published and twenty to retain a dofollow link. Scores are weighted, rather than simply counting voters.
I would treat this as an event to prepare for. Have a working demo, answer questions, and understand the participation rules before choosing the route.
Official rules checked. These are free-plan rules at the research date; other plans have different retention terms.
4. Fazier: Add Your Product to a Discovery Platform
Fazier offers a free Basic plan that requires a backlink on your homepage or footer. The submission page states review and listing within thirty days, with homepage featuring if selected.
Before using it, decide whether the badge or link fits your website. I would make that choice alongside the audience fit. Prepare screenshots that explain the product at a glance and choose a category that accurately describes what it does.
Official plan checked. Premium visibility and backlink benefits differ by tier. This is not a report of a completed LatticeSpot launch on Fazier.
5. TryLaunch: Schedule Your Project’s Introduction
I submitted LatticeSpot to TryLaunch using its free plan. My submission record shows a scheduled launch on October 5, 2026, at 00:01 Malaysia time. Preparing it involved a logo, tagline, product description, categories, and screenshots.
That experience helped me build a reusable submission kit. The same source files can support another listing, while the introduction can be adapted to the next platform’s audience. Keep a copy of the final description so your public profiles remain consistent.
Status on October 3: scheduled, not yet published. This records my submission experience, not clicks, customers, or verified link attributes.
6. Show HN: Let People Try What You Built
Show HN is for something you made that people can actually try. Its guidelines ask the maker to be present for discussion and encourage reducing signup barriers. A landing page alone does not fit that format.
Choose this route when you can offer a meaningful hands-on experience and have time to answer questions. Read the community rules, including its prohibition on asking friends to upvote or comment. For preparation, read how to launch before you have an audience.
Guidelines checked. This describes a route for eligible working projects, not confirmation of a LatticeSpot submission.
7. LatticeSpot: Give Your Project a Visual Home
I built LatticeSpot around a shared pixel canvas. Introduce your project with an image, a story, and a website link. Each published placement has a dedicated public page; the current canvas position and the retained record serve different purposes.
Start by applying for one free empty pixel. Choose an image that remains recognizable at a small size, then use the public page to give your project context. Larger paid areas offer more room. The pixel advertising guide explains the image, position, and public record.
One empty pixel per account; verified email required; no manual approval. Positions are replaceable. Website links use sponsored/nofollow; search engines decide indexing. I am the founder.
Choose the Participation That Fits Your Launch
A useful difference emerged while I compared these routes: submitting a website can mean very different activities. A reviewed directory asks you to prepare a clear listing and await a decision. A launch event can ask you to participate on a particular day. A hands-on community asks you to make the product usable and stay around for questions.
That changes how I would choose a platform. If I have an hour today, I can prepare a directory application. If I have a working demo and time for discussion, a feedback-led launch may be a better use of the afternoon. If publication depends on voting, I need to understand that mechanism before treating the launch as a simple listing.
My interpretation is that some launches test two things at once: how people respond to a product and how well the maker can bring people into the launch. A quiet result does not tell me which part needs work. I would inspect actual trials, questions, and website visits before deciding what to change.
This is why I would avoid ranking every platform by its total audience. The relevant question is whether I can participate well in its format, with the product and time I have now. A popular destination can still be the wrong next step for a particular project.
Build Your Submission Kit Once
Keep one folder with a square logo, two or three current screenshots, your website URL, a short tagline, and a compact description. Add a document containing the category, maker name, and a contact email you check. Having these ready lets you spend the next session choosing the right message instead of finding files.
For the tagline, name the job your product helps someone do. For the description, explain who it is for, what someone can do, and where they should start. Replace broad praise with an observable action. “A revolutionary productivity experience” tells me less than “Save meeting notes and turn decisions into assigned tasks.” The second sentence is an illustrative example, not a claim about LatticeSpot.
Use screenshots of the actual product. Choose one clear task or output per image, remove private information, and keep text readable on a phone. A screenshot should help a visitor understand the interface rather than repeat the headline in decorative lettering.
Then adapt the kit. A directory needs a compact introduction; a discussion community may need a working example and the reason you built it. My startup submission checklist takes you through those choices.
Turn Each Submission Into a Clear Next Step
After submitting, record the date, platform, route, and current status. A confirmation means the form arrived. A scheduled date means a launch is planned. A public URL means you have something people can open. Keeping those stages separate makes the next action obvious.
When the listing becomes public, open it on a phone and check the image, description, and destination link. Correct anything that could confuse a visitor. Save the listing URL next to the original submission record, then note any useful questions or activity you can observe.
For traffic, use the measurement tools available on your own site. A tagged link can help supported analytics attribute visits, where the directory allows it. Keep a clean website URL for fields that require one. A click, a signup, and a sale answer different questions, so choose the action that matters before evaluating the launch.
If you are still preparing the website, begin with the first-visitor plan. If you have a listing to evaluate, use the promotion measurement guide. Finish each attempt knowing what to keep, improve, or try next.
Your Next Launch, Explained
Where can I promote a new website for free?
Choose a format that matches the project. The options above include directory applications, scheduled product launches, community demonstrations, and a visual canvas. Start with the comparison table, then check the linked submission rules before preparing your application.
Can I submit before I have customers?
Prepare an honest introduction around what works today. Use real screenshots and explain the intended audience. Leave testimonials and customer numbers out until you have them. Working-product communities may accept early projects, while their guidelines still determine what qualifies.
Should I submit to every directory?
I would begin with a short list I can finish and follow up. Choose by audience, eligibility, and effort. A platform that requires a different product type is a poor fit even when its submission form is easy to complete.
Will a free listing bring visitors?
A listing creates an opportunity for discovery. What follows depends on its visibility, audience, message, and destination. Record the result you observe. Use early questions and useful actions to improve the next attempt rather than promise yourself a particular visitor total.
How can I keep the process manageable?
Choose one platform, prepare the kit, submit, and record the next step. Keep pending reviews separate from live pages. When you return to promotion, continue where you left off instead of repeating the research. Save the final copy and screenshot so future updates have a clear starting point.
Give Your Project a Spot of Its Own
Put your image on the canvas and introduce your project with a public placement page. Start with a free pixel application.
Explore the Canvas →One free empty pixel per account. Verified email required; no manual approval. See how placements work.